Showing posts with label Recipes. Show all posts

Wednesday, December 16, 2015

Snickerdoodles and the Great Cookie Swap


I absolutely loved participating in the Great Food Blogger Cookie Swap.  While this was the 5th annual cookie swap, it was my first year participating.  I baked, packed, and sent off snickerdoodles to bloggers all over the country.   The cookie swap was a fun opportunity to share cookies with (and better yet to receive cookies from) participants all over the country, while benefitting a great cause.

Wednesday, October 28, 2015

Banana Blueberry Oat Muffins

With it turning cool, I've been turning to oatmeal and other warm breakfasts.  These Banana Blueberry Oat Muffins are easy to throw together.  They're filling without being too sweet.

Friday, October 23, 2015

Peanut Butter Frosting


Not to brag, but I make a mean chocolate peanut butter cake.  It's chocolate cake with a chocolate buttercream frosting and a fluffy peanut butter frosting in the middle.  The peanut butter frosting is what makes the cake.  It's light and fluffy but substantial enough to hold up the top layer of the cake.

Tuesday, October 20, 2015

A Jewish Baker's Pastry Secrets

Recipes from a New York Baking Legend for Strudel, Stollen, Danishes, Puff Pastry, and More.
by George Greenstein

This book made me feel like such a legit baker.  Greenstein spends full chapters on streudel and babka and provides a wonderful recipe for puff pastry.  He discusses at length the importance of quality ingredients and shows his care for what he makes in his writing.

He starts off with the ingredients and equipment, going into details about what bakers should look for in different flours and fats.  He is all about quality when it comes to food, and while we can't all afford cocoa powder imported from Holland or Hungarian fruit butter, he provides realistic tips as well.  He also covers the baker's equipment, including anything and everything you could need, from parchment paper to the ideal setting for your refrigerator.

Thursday, July 30, 2015

Everyday Detox by Megan Gilmore


It's hard to think of detoxes without thinking of days of juice cleanses and salads. Megan Gilmore's approach, in Everyday Detox is more of a lifestyle change.  It's a long term approach to ridding your body of, as Megan calls the vague additives and chemical preservatives of processed foods.  There are so many of testimonials to the effects of a whole food diet in general as well as associated with this book. 

Friday, July 24, 2015

Icebox Coffee Toffee No Churn Ice Cream


I was pretty excited to hear that Birmingham based, Icebox Coffee and Birmingham Bloggers are holding a recipe contest because  1. I love iced coffee and  2. I've been all about finding recipes to stay cool this summer.  I've tried both flavors of  Icebox coffee concentrate and love them both.  This was really a great excuse to buy more iced coffee.  Thankfully, I managed to save enough to make this delicious treat.

Saturday, April 4, 2015

Easy Easter Cake Decorating

What dessert screams Easter more than a carrot cake.  I can't think of any, but my love of this cake could make me a little biased. This year mom asked me to bring one to Easter Sunday lunch, and I got a little excited.  I decided to make a few cupcakes as well for the kids.  I followed the carrot cake recipe from The Back in the Day Bakery Cookbook, one of my favorite cookbooks, and multiplied it by 1.25, to give myself a little extra for the cupcakes.

The frosting is a cream cheese frosting (except for the green carrot tops, which are royal icing).  Both frosting recipes are listed below.  I separated about 1 cup of the cream cheese frosting out and used  about 1/8 teaspoon Wilton gel icing coloring in orange.

For the cupcakes, I allowed them to fully cool, then cut a small cone out of the center of the cupcakes using a paring knife, about 1 inch in diameter.  I filled the cone shaped hole with the orange icing using a large round tip and moving straight up, until the carrot stood about 1/2-3/4 inch over the cupcake. I used the cream cheese icing to cover the rest of the cupcake.  I then used the green royal icing to make the tops. Perfecting the texture of royal icing can be a little difficult.  It shouldn't be anywhere as thick as the cream cheese icing, but you do want it to be able to hold a little bit of a shape for drawing the carrot tops.  I drew the tops on a spare piece of parchment paper and really just scribbled a few lines.  Obviously, I'm no artist, when it comes to icing, and I'm really impatient, so I made extra.  The tops needed to dry about 3-4 hours depending on thickness.  It would do well to leave them overnight if you can. Once they were dry, I very carefully pulled off the parchment and stuck the royal icing tops into the top of the carrot.


Since I was coloring the icing, I thought why not decorate the cake as well.  The carrots were made with a large round tip like this one. The tops were made with the same royal icing.


Royal Icing Recipe


Ingredients:

1 large egg white
1/2 teaspoon vanilla extract
1 1/2 cup confectioners sugar, sifted

Directions:

  1. Beat egg whites, vanilla, and confectioners sugar with an electric mixer until smooth. 
  2. Add additional confectioners sugar or water to reach desired consistency. 

Cream Cheese Frosting

Ingredients: 

1 stick of butter
2 packages of cream cheese
1/2 tablespoons vanilla extract
6-7 cups powdered sugar

Directions: 

  1. Beat butter, cream cheese and vanilla together in a stand mixer (a much less time consuming task if the cream cheese and butter are closer to room temperature)
  2. Slowly add the confectioners sugar until a desired consistency is reached.

Hope you have a wonderful Easter! 

Sunday, March 8, 2015

Mashed Root Vegetables

 A little over a year ago, Seth and I ate at a little restaurant in Tallahassee that a coworker of his recommended. It was called Mikosukee Root Cellar and I had the meatloaf with mashed root vegetables.  It was hands down the best meatloaf I think I have ever had and the mashed "root vegetables," were so stinking good.  I'm not particularly sure what root vegetables were used in the dish, I don't think they're even served currently, but I've tried recreating that interesting side a few times now.  This dish is not the same thing; it's even better.  I just had to share. The parsnips give the dish a sweet cinnamony flavor, similar to, but with a better texture than sweet potatoes, and of course, mashed potatoes are always good! The two blend together so well that you really don't need the sour cream or mass amount of butter many recipes call for.  Hope you enjoy!

Mashed Root Vegetables
8 servings

Prep Time: 5 minutes
Cook Time: 30 minutes


Ingredients:
4 large Parsnips (1lb)
5 red potatoes (1.5 lb)
1/4 cup butter
1 teaspoon lemon zest
1 teaspoon parsley
1/2 teaspoon thyme
salt and pepper to taste

Directions:
  1. Add peeled parsnips and potatoes to a large pot of salted water and bring to a boil. 
  2. Reduce heat to low, cover and cook fro 25-30 minutes
  3. Drain water and add butter, lemon zest, and herbs.
  4. Use an immersion blender or hand mixer to blend together the vegetables. 
  5. Season with salt and pepper and serve.

Thursday, March 5, 2015

Vegetable Pot Pie for 2

Temperatures outside have gone from the upper 60's to the mid 30's in the past 12 hours.  Yesterday I was out running in shorts and a tank and today, I'm cuddled up with a blanket.  The weather has been crazy to say the least.  While I generally love winter and enjoy the cooler weather, I'm over it, as is, I believe, the rest of the country.  However, as I have no control over the weather, all that's left to do is to eat good food and try to stay warm.  I feel like I've been living off of carbs and warm soups since the start of winter, and I have thoroughly enjoyed it. This simple pot pie recipe has become a super easy go to. So, grab your vegetables and get ready! 


Vegetable Pot Pie for 2
Prep Time: 35 minutes
Cook Time: 30 minutes
 
Ingredients:
1 tablespoon extra virgin olive oil
1/2 cup onion finely chopped
1 clove minced garlic
3/4 cup celery, chopped
3/4 cup carrots, chopped
3/4 cup portobella mushrooms, chopped
3/4 cup potato, chopped
1/4 cup flour
1 cup broth
1/4 cup milk
1 cup peas
1/2 teaspoon thyme
1/2 teaspoon parsley
salt and pepper to taste
1 egg yolk 
Or just use a pre-made 

Directions:
  1. Saute onion and garlic in oil  for 3-5 minutes on medium-high heat.  
  2. Add celery, carrots and mushrooms and reduce heat to medium. Cook another 6-8 minutes. 
  3. Add potatoes and stir in flour; cook for 2 minutes while stirring.  
  4. Add broth and milk and stirs until the mixture just comes to a boil and thickens. 
  5. Reduce heat to low and fold in peas, herbs and salt and pepper
  6. Roll the dough out thinly and line the small casserole dish; use a fork to poke holes along the bottom. Fill with vegetables and broth and cover with the remaining rolled out dough. 
  7. Whisk the egg yolk with 2 teaspoons water and a dash of salt.  Brush the mixture over the dough and between the layers of dough. Cut a few holes across the top to vent.
  8. Bake 30-35 minutes
  9. Let rest for 10 minutes before serving. 
Enjoy!

Tuesday, January 20, 2015

Roasted Winter Vegetables


....And one more time. I haven't had the best luck on the computer front lately.  Between my computer's meltdown with the installation of Lightroom, and Blogger deleting multiple posts, I was pretty much ready to throw this thing out.  I think my computer may have just needed a break - don't we all from time to time.  Now on to more important things, like food...

Don't be dismayed by the brussels sprouts in this roasted vegetable medley.  While I'll admit I've only ever tried brussels sprouts roasted, I find them absolutely delicious. If you just aren't sure about them, this is the way to try them (or really almost any vegetable). A cousin to the common cabbage, brussels sprouts are excellent sources of vitamin C and vitamin K. Combining them with potatoes, carrots and onions, as well as a few herbs, creates a well balanced and flavorful meal. 

I had initially intended on this recipe being a little more dependent on winter vegetables, but local availability of parsnips, and a sub-par job of grocery shopping put a halt to that idea.  I grabbed a few new potatoes I had on hand and threw in a few aromatics, and viola, an easy and delicious dinner (or side dish, if you prefer).

Roasted Vegetables
Prep Time 5 minutes
Cook time 30-40 minutes

Ingredients:
2 cups chopped red potatoes
2 cups chopped brussels sprouts
1 cup chopped carrots
1/2 cup chopped yellow onion
2 cloves minced garlic
3 tablespoons extra virgin olive oil
1 teaspoon oregano
1/2 teaspoon thyme, fresh or dried
1/2 teaspoon chives, fresh or dried
salt and pepper to taste

Directions:
  1. Preheat oven to 375°F
  2. Combine chopped vegetables in a large bowl, add olive oil, herbs and seasonings and toss
  3. Spread evenly in a large (9 x 13) casserole dish
  4. Bake 30-40 minutes, until potatoes are tender and brussels sprouts start to develop a golden color

Wednesday, November 26, 2014

Cranberry Orange Scones

Pin It
I hope wherever you may be spending your Thanksgiving is filled with love and good food and more than anything, thankfulness.  I will be spending the holiday and I'm sure eating a ridiculously rich dinner with my large family.  It's easy for me to get frustrated in the chaos of the holiday.  So many people going in so many directions (and so many sales to remind me that I haven't started on any Christmas shopping), but I will be doing my best to rest and take in the time I get to spend with nieces and nephews and brothers and sisters.  I hope you will too, whether it is time spent with sibling, parents, or friends, I hope your Thanksgiving is filled with those you care about.

An easy way to start off your Thanksgiving day would be with these cranberry orange scones.  I love a good scone, and the orange-y sweetness is a great complement to the slightly tart cranberries.  This could easily be made with fresh or dried cranberries and are would still be delicious without the orange extract if you don't have it on hand.  The best part is that these are very quick and easy to throw together, allowing you to get onto more important things like whipping together casseroles and basting turkeys.

Cranberry Orange Scones
Makes 8 scones

Prep Time: 10 minutes
Bake Time: 18-22 minutes

Ingredients:
2 cup all purpose flour
2 teaspoons baking powder
1/2 teaspoon salt
1/4 cup brown sugar +2 tablespoons
1/2 cup cold butter
1 cup cranberries
zest of 1 orange (about 2 teaspoons)
1 cup very cold milk +1/4 cup (ideally full fat milk or even cream)
1 teaspoon orange extract

Ingredients for the Glaze:
1 cup powdered sugar
2 tablespoons orange juice
a dash of cream of tarter (will help glaze to set up)

Directions: 
  1. Preheat your oven to 400 and line a large baking sheet with parchment paper. 
  2. Sift together your flour, baking powder, and salt. Mix in the brown sugar. 
  3. Cut the cold butter into pea-sized chunks and add to your dry ingredients. Blend the butter in with a wooden spoon or stand mixer. A great idea would be to use a food processor or pastry blender like Ashley suggests (if only I had read that sooner). I ended up just using my hands to finish kneading this together; you want the butter blended in, but you don't want to over mix to the point where the butter starts to warm.
  4. Mix in dried cranberries and orange zest.
  5. Add the milk and orange extract and work the dough together by hand until just combined. Over mixing may produce some hard scones, which nobody likes.
  6. Gather your dough into a ball and roll out onto a floured surface until about an inch thick.
Pin It!

  1. Use a pizza cutter or a knife to cut the circle of dough into slices. You can always cut those slices in half for smaller scones. 
  2. Move the scones to a baking sheet lined with parchment paper and brush the extra 1/4 cup of milk mixed with a teaspoon of vanilla on top of each scone. An option is to sprinkle the two additional tablespoons of sugar on top.
  3. Bake for 18-22 minutes, until a slightly golden color begins to appear on the corners. You can serve them warm for an quicker option or allow them to cool and add an orange glaze (that I promise is worth the few extra minutes.)
  4. Create the glaze by whisking together the orange juice, powdered sugar, and cream of tarter.  The cream of tarter will allow the glaze to set up, it's okay to exclude it if you don't have it on hand or don't intend on waiting on the glaze to set up. Drizzle over the cooled scones and serve.
Hope you enjoy and have a wonderful Thanksgiving,


Tuesday, November 18, 2014

Almond Cranberry White Chocolate Cookies


Pin It!

I made these a couple of weeks ago for a family lunch that I ended up getting to about 45 minutes late.  A positive aspect of staying in Alabama, is my family.  It's big, loud and a little crazy, but very happy.  Everyone is nearby, and able to regularly get together. My mom cooks lunch every weekend for everyone who can join and it's always delicious. As I said, these were meant to be dessert, but a hodge podge of issues resulted in my arriving after everyone had eaten.  They were still sampled, and everyone seemed to really enjoy.  My grandmother even thought they were the best I had ever made, but of course, what are grandmothers for if not complements.

If Thanksgiving had an official cookie, I would like to think this would be it.  The cranberry, in addition to the beautiful color it provides, adds a bittersweet kick to the white chocolate.  The almonds give a great texture and add a delicious little flavor.  Personally, I think the solid amount of butter also aids in the warm fuzzy feeling of Thanksgiving in this cookie.  I may be biased, but I loved these and hope you will too.

Almond Cranberry White Chocolate Cookies
Makes 28 cookies

Prep Time: 12-15 minutes
Cook Time: 15-20 minutes

Ingredients: 
½ cup and 2 tablespoons unsalted butter, softened
½ cup packed light brown sugar
½ cup granulated sugar
1 tablespoon vanilla extract
1 large egg, beaten
1 ½ cup unbleached all purpose flour
½ teaspoon baking soda
½ teaspoon sea salt
1 cup dried cranberries
1 cup white chocolate chips
½ cup sliced almonds

Directions:
  1. Preheat your oven to 350F and line a cookie sheet with parchment paper. 
  2. Sift together the flour, baking soda and sea salt and set aside. 
  3. Cream together butter and sugars on medium speed until light and fluffy (3-5 minutes).
  4. Add in vanilla and beaten egg, mix until just barely combined.
  5. Add in your flour mixture a third at a time.
  6. Mix in the dried cranberries, white chocolate chips, and almonds. 
  7. Drop heaping tablespoon-sized dollops of cookie dough onto the parchment paper, leaving a 2 inches between each cookie, I even smooshed them down a little.
  8. Bake 15-20 minutes, until the edges of the cookies are slightly golden. 
  9. Let rest on the cookie sheet for just a minute, then move to a cooling rack. 
                                                                                                                     Hope you enjoy!

Sunday, November 9, 2014

Three Bean Vegetarian Chili

Pin It!

Does anyone else feel like the time change kicked their butt?  While it's been great to feel like I've gotten to sleep in every day, the nights have been a complete drag.  I've barely managed to walk B and eat dinner before half way falling asleep on the couch.  Thankfully, I have had plenty of leftover chili to eat after making a big batch early this week.

I've previously mentioned my love of soups and my search for more vegetarian soup options. This is more of an old favorite, but it is vegetarian and delicious. I've always associated chili with football and cold weather, making this the perfect time of the year to whip some up.  This recipe is very simple and can easily be customized to your preferred amount of spice.  The chopped chili peppers really don't have too much of a kick once cooked down and the listed recipe is pretty mild as is.  If you'd like more of a spice try adding a little more chili powder or throwing in some red pepper flakes.

Vegetarian Three Bean Chili
Makes 8-10 servings

Prep Time: 10 minutes
Cook Time: 45 minutes

Ingredients:
2 tablespoons extra virgin olive oil

1 large white onion, chopped
2 cloves garlic, crushed
1 medium green bell pepper, chopped
2 chili peppers, finely chopped
1 large (28 oz.) can crushed tomatoes
1 (15 oz.) can black beans, rinsed and drained
1 (15 oz.) can pinto beans, rinsed and drained
1 (15 oz.) can kidney beans, rinsed and drained
3 ½ cups water

1 tablespoons chili powder
½ tablespoons cumin
½ tablespoons dried oregano

½ tablespoons seasoned salt
½ tablespoons sugar

Directions
  1. In a stock pot, saute the olive oil, onion, garlic and peppers on medium heat until slightly cooked, stirring often 3-5 minutes.
  2. Add the remaining ingredients and bring to a boil. 
  3. Reduce heat to a simmer and cover.  Cook for 30-45 minutes.
Easy as pie. All that's left to do is to throw some cheese on top and enjoy!

Tuesday, November 4, 2014

Flourless Pumpkin Oat Muffins


Pin It!


Sometimes mornings are hard. While I've become so much more of a morning person over the past few years, cooking a full breakfast while having a leisurely cup of coffee is not even remotely in my weekday routine. My breakfast generally consist of a smoothie or overnight oats. Anything you can throw together quickly (or the night before). 

These muffins were very easy to throw together and, stored properly, could easily last a few days. Better yet, the recipe is so simple, you could easily put in the extra 5 minutes to bake them in the morning. They make a very filling breakfast and a great way to start the day, if I don't say so myself.
Flourless Pumpkin Oat Muffins
Makes 16
Prep Time: 5 minutes
Cook Time: 28-30 minutes

Ingredients:
1 cup brown sugar
1 cup pumpkin
¼ cup canola oil              
2 eggs
1 ¼ cup vanilla soymilk
3 cups old fashion rolled oats2 tsp baking powder
¼ tsp salt
4 tsp cinnamon

Directions:
  1. Preheat oven to 350F and line a muffin tin with cupcake papers
  2. Combine oil, sugar, pumpkin and eggs until just combined.
  3. Gently whisk in milk. 
  4. Separately combine oats, baking powder, salt and cinnamon and fold into wet mixture. 
  5. Scoop ¼ cup of batter into each liner and top with whatever goodies you'd like. Crushed macadamia nuts, sliced almonds or white chocolate chips are all delicious. 
  6. Bake for 25-28 minutes. 
Hope you enjoy!
Pin It!


Tuesday, October 28, 2014

Vegetable Lentil Soup

Vegetable Lentil Soup

It's just starting to cool off, and I'm already getting excited about making soups and chilli's.  I love making a big pot of soup on the weekend and being able to freeze it or take it for lunches.  It's easy, nutrient rich, can help prevent bloating, and has been noted for aiding in weight loss (depending on what you're throwing in).  This year I'm looking for more vegetarian soup ideas outside of the usual vegetable soup.  This one seemed like a great addition to my limited list of soup recipes and it will definitely be a repeat.  Lentils are low in fat and a good a source of protein and fiber. The carrots, celery and other vegetables bring some great nutrients to the table as well.  This soup is super flavorful. It definitely has a kick to it (back off on the cayenne if that doesn't sound like a good time to you) but the oregano, paprika, and lentils bring out a somewhat sweet taste. This recipe is a perfect fall meal.

Vegetable Lentil Soup
Makes 8 servings

Prep Time: 15 minutes
Cook Time: 2 hours

Ingredients:

2 tablespoons extra virgin olive oil
1 cup chopped onion
2 cloves garlic
1 ½ cup chopped celery
1 ½ cup chopped carrots
1 cup dry green lentils
1 medium tomato, diced
1 ½ teaspoon oregano
1 teaspoon ground cumin

½ teaspoon paprika
½ teaspoon cayenne pepper
a couple dashes black pepper and salt
3 cups vegetable stock
3 cups water

Directions:
  1. Sauté onion and garlic in olive oil over medium heat until tender. Stir often.
  2. Add celery, carrots, tomato, lentils and spices and continue to cook 5 minutes.
  3. Add vegetable stock and water and bring to a boil for a couple minutes.
  4. Reduce heat to a simmer and cover.  Allow to simmer for 45 minutes until lentils are tender, stirring periodically. The soup will be done after 45 minutes (everything will be thoroughly cooked) but allowing it to simmer for a couple hours really brings out the flavors.
This could easily be frozen and saved for later. Hope you enjoy!

Monday, October 20, 2014

Buffalo Hot Wing Pretzels

Pin It!

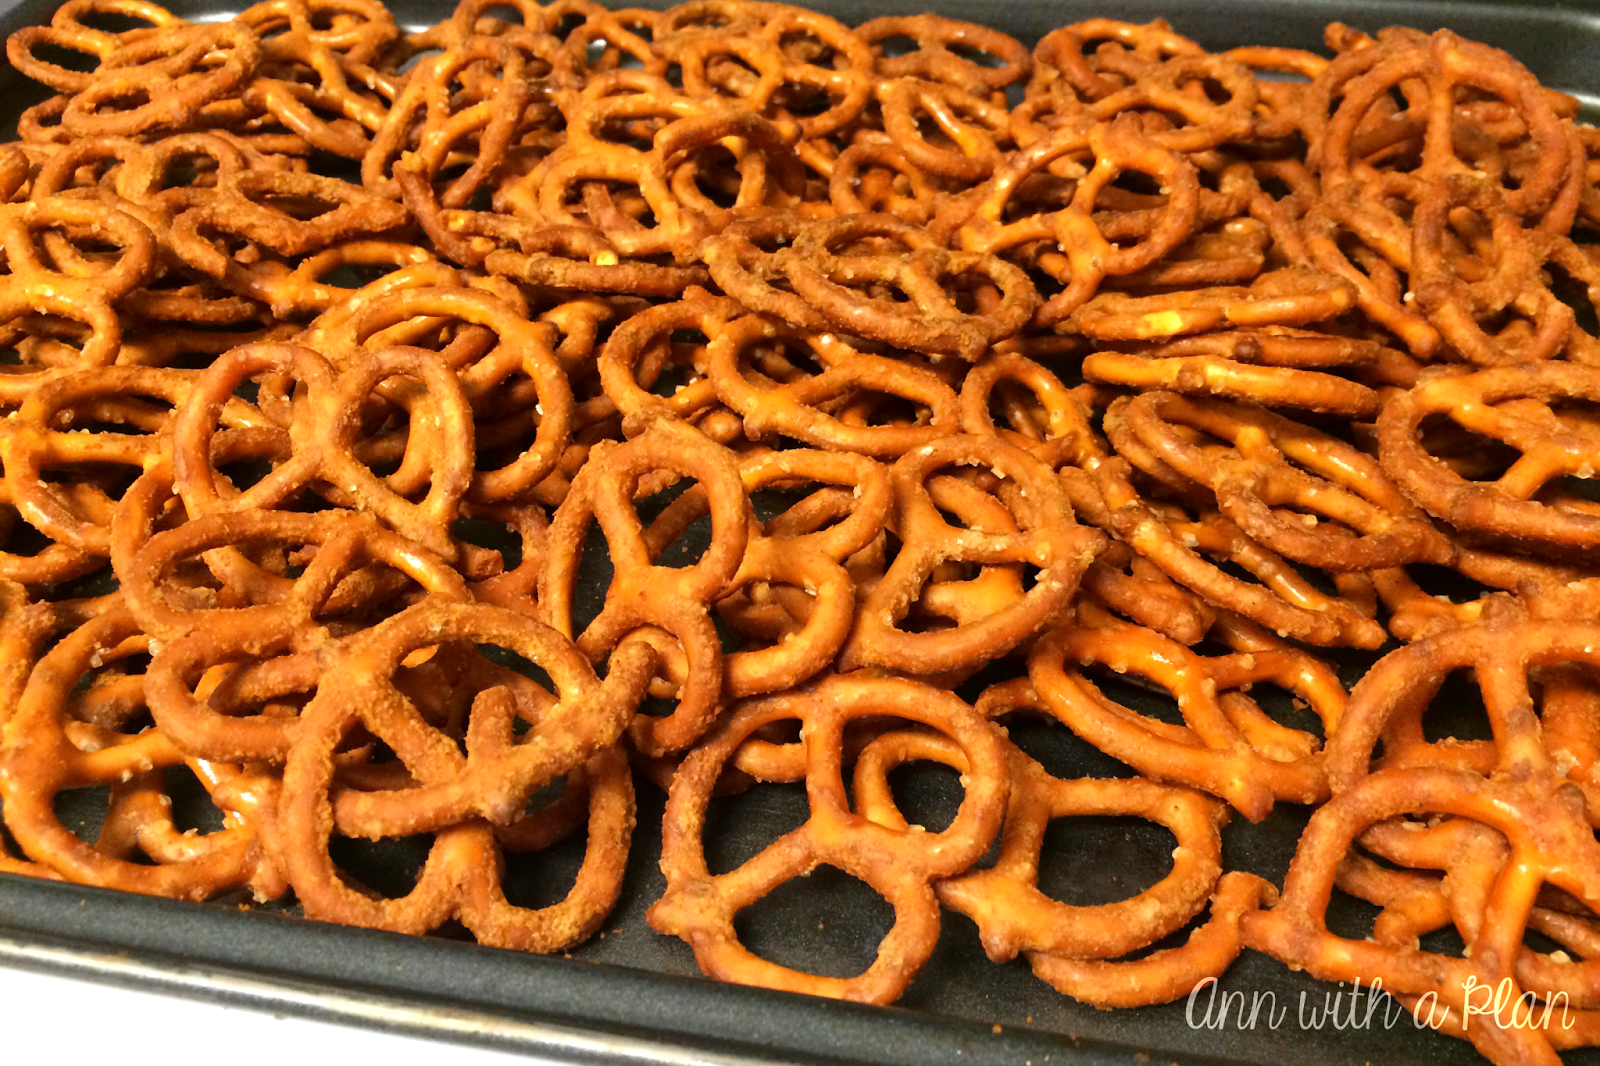
I have now made these a few times in the past month, I love them that much.  This is not even remotely a healthy recipe, but I am already a sucker for hot wings and anything buffalo flavored.  A great bonus to this tasty little snack is that they pack that hot wing kick without the huge mess.  I made a batch of these for our beach trip from a recipe I originally found on Mom In Time Out.  They were good, but they turned out a little Worcestershirey for me. A little tweaking brought me to the recipe below, which has a little more of a buffalo kick without the aftertaste of Worcestershire. It is definitely my favorite.

Buffalo Hot Wing Pretzels
Super easy and a great game day snack

Makes: 1lb Pretzels

Prep Time: 5 minutes
Bake Time: 30-45 minutes

Ingredients:
½ cup Frank’s buffalo wing sauce
½ cup butter
1 tsp Worcestershire sauce
2 tsp garlic powder
1 tsp seasoned salt
16 oz bag of pretzels

Directions:
    1. Preheat oven to 300F and line 2 large cookie sheets with parchment paper. 
    2. Melt butter, wing sauce, and Worcestershire sauce over medium heat until combined. Stir often; this should take less than 5 minutes.
    3. Add garlic powder and seasoned salt
    4. Empty the entire bag of pretzels into an over sized bowl
    5. Drizzle hot wing mixture over pretzels and gently toss until all pretzels are coated. 
    6. Spread pretzels across parchment paper somewhat evenly and bake for 30-40 minutes, stirring every 10 minutes, until dry.
If you have extra time, let the pretzels sit for 10-15 minutes after coating. If really gives it an extra pop of flavor. Hope you enjoy!

Tuesday, October 14, 2014

Burrito Bowls and Burrito Salad


I eat way too many burrito bowls.  Not only do these fix my weekly Chipotle cravings, they are quick go-to meals that I can easily pack up for lunch the next day.  I don’t really have too defined of a recipe I go by, but instead try to work with whatever produce I have in my kitchen.   This is definitely a fun flexible meal.

A friend and I happened upon Chipotle a few weeks ago and I decided to try the salad.  It was not only huge, but delicious.  It was like a burrito bowl on a bed of lettuce with this wonderful chipotle vinaigrette and I thought “I can do that.”  Well this week was the first I’ve made and while not the same as Chipotle’s, it was delicious (and I would like to think, a little healthier).  Instead of a recipe, I’m just going to list the components and let you handle the assembly.  I stick to a love of vegetables, but you can really however much you would like of each component.

1.       Cilantro Lime Rice
I know everyone has their own tricks for cooking rice but I generally cook mine in the oven.  It’s how my mom does it, and I have yet to burn it this way.  Combine ½ cup rice and 1 cup water in small casserole dish add a dash of salt, 1 teaspoon fresh cilantro (or a little more if using dried cilantro).  Cover dish with foil and cook for 30 minutes at 350F (45 if doubling) then turn off oven and let sit for at least 30 minutes.

2.       Black Beans
I used organic canned black beans, but if you read the labels, a lot of products are sticking to more natural preservatives like salt.  Heat up and maybe throw in a little garlic ( ½ clove at the most) and dash of cayenne pepper

3.       Sautéed onions and peppers.  If I have any on hand, I’ll usually sauté in extra virgin olive oil for just a few minutes, until slightly soft.

4.       Tomatoes, sweet corn, avocado, anything else that may sound good.  Once again, if it’s on hand.  Corn and avocado are so good to top off your bowl/salad. 

5.       Dressing, salsa, guacamole.  I haven’t been able to find a chipotle vinaigrette and haven’t yet experimented with making my own.  I did find Marie’s chipotle ranch in the refrigerated section and while it may not be as healthy as the vinaigrette, man is it good.

My burrito salad, shown above, included romain lettuce, cilantro lime rice, black beans, sweet corn, avocado, and Marie's chipotle ranch. Like I said, assembly and the little extras you can include are totally up to you.  I can’t imagine it not being great! 

Tuesday, October 7, 2014

Pumpkin French Toast


I truly believe fresh is always better.  That being said, I would rather stump my toe on hot coals than try to puree a pumpkin again.  An old roommate and I had a go at making pumpkin pie from scratch several years ago. That pie remains on my top 10 list of the worst things I have ever eaten.  So, the following recipe is super easy and uses canned pumpkin.  French toast is one of my favorite breakfast foods and is so easy to make.  This made a small batch for two or three people (6-8 slices of toast)

Pumpkin French Toast

Makes 8 slices

Prep Time: 5 minutes
Cook Time: 5 minutes

Ingredients:
  bread (I used white, but wheat works as well)
  ¼ cup pureed pumpkin
  ½ cup milk
  2 eggs
  ½ teaspoon cinnamon and nutmeg to taste
  ¼ teaspoon nutmeg
  Maple syrup

Directions:
  1.  Grease a skillet with butter and bring to medium heat
  2.  Whisk together your eggs, milk, pumpkin, cinnamon, and nutmeg
  3.  Dip a slice of bread in the egg mixture, make sure the bread is covered and move to skillet
  4.  Cook on medium heat until the egg is fully cooked, look for a light brown color before flipping (approximately 3-4 minutes on each side).
Notes:
   French toast can  be easily saved for later by freezing it between sheets of parchment paper and reheated by toaster or microwave. 


Thursday, September 25, 2014

No-knead Wheat Bread


Who knew it was so easy to bake your own bread?  I don't buy bread anymore because there is no way for me to eat a loaf before it goes bad.  Not that this recipe didn't make more bread than I could eat, but I feel like it is way more acceptable to share fresh baked bread with a neighbor than trying to get someone to go halvesies with you on a bag of sliced store-bought bread.  An additional benefit to making your own bread is the wonderful smell that will fill your home.

I found this recipe on the side of a bag of Gold Medal all purpose flour and thought, "I bet I can do that." You can find the original recipe here.  For the most part, I followed the original recipe.  The few changes I made included using mostly whole wheat flour and cutting back on the salt.  The bread is best within the first couple days (and amazing when eaten fresh out of the oven).  I will definitely be experimenting with added herbs and cheese in the coming weeks.

No-Knead Wheat Bread

Makes 4 small loaves

Ingredients: 
3 cups lukewarm water
5 cups whole wheat flour
1 1/2 cups unbleached all purpose flour
1 package active yeast
1 1/2 tablespoons coarse sea salt

I used a stand mixer and allowed the dough to set in the bowl with a towel over it. The dough rose for about 2 hours at room temperature.  I then transferred the dough to the refrigerator where it stayed for an hour.  This step wasn't completely necessary, but it did make it easier to handle.  You can tell from my picture, I got a little excited with the flour.  It is very necessary for handling, but too much will make it a little tough.

Hope you enjoy!

Thursday, September 4, 2014

Cinnamon Raisin Granola


I don’t know if I’ve mentioned this before, but I love cinnamon. Also, raisins, the original favorite dried fruit. I love mixing the combination into oatmeal and of course adding cinnamon to oatmeal raisin cookies. I’ve never tried making granola before, and couldn’t believe how easy it was. With the honey and brown sugar, this isn’t the healthiest snack, but it is very filling. I love eating it dry for a snack, or with cold milk or yogurt. With a little warm milk, this would make a great cold weather snack.


CINNAMON RAISIN GRANOLA
Quick and easy homemade granola

Prep time: 10 minutes
Bake time:  30 minutes

INGREDIENTS:
3 cups old fashion or steel cut oats
1 1/2 cup raisins
1 cup sliced or slivered almonds
1/4 cup ground flax seed
1 tbsp. cinnamon
1 tsp. nutmeg
a pinch of salt
1/2 cup honey
1/4 cup grape seed oil (you could also use coconut or canola)
1/4 cup brown sugar

DIRECTIONS:
  1. Preheat oven to 300F and line a large cookie sheet with parchment paper.
  2. Once again, grind the flax seed. A coffee grinder would be ideal for this, but I used a food processor/blender. It took a little more patience and stirring but still worked well.
  3. Combine the oats, raisins, almonds, flax seed, cinnamon, nutmeg and sea salt in an over-sized bowl.
  4. In a small saucepan and over medium-low heat, combine the oil, honey and brown sugar. Stir frequently until the brown sugar starts to dissolve, this should take no more than 5 minutes; do not bring to a boil.
  5. Pour the hot sugar mixture over the oat mixture and stir. This isn’t something you would need a mixer for. Just a few quick stirs to make sure everything is coated and you’re good to go.
  6. Spread the oat mixture on the parchment paper and bake for 15 minutes. After the initial 15 minutes, stir/flip/turn the granola. Check and turn the granola every 8-10 minutes until golden brown. Mine was done in 30 minutes, but I have a gas oven- which can be a little dryer of a heat.
  7. Let cool. I left mine on the cookie sheet for a few hours.
NOTES:
Deciding when the granola was done was probably the hardest part of this process with all the cinnamon in there. I taste tested each time I pulled the pan out and stopped when the granola started to reach a crunchy consistency.


                                                                                                    Hope you Enjoy!